The Novice Survivalist
A novice outdoorsmen learning camping, fishing, bushcraft and survival. "KNOWLEDGE IS A SURVIVAL SKILL"
Dirt Time 8 – Compass
We all know we need to be aware of the region in which we have decided to either “bug out to” or get to in a survival situation. Having a Map of the area, marked out with the location and route to get there is part of the plan. During the planning of your “get to safety”, you should at the very least have a map of the area. Great!.  But what about unforeseen situations arising and your route is blocked for some reason or another. Navigating around in the wilderness or in an urban area should be a skill every novice survivalist needs to master. OK not master, but at least have a firm grip of the basics. We are not talking about celestial navigation, We are talking about using a compass and a map, to get you to a location you feel is a safe haven. Be it Home, or a predetermined rendezvous point with the rest of your survival group.
Your well thought out , pre planned safe haven route, has just turned out to be not so safe. Now you have to get to another point or deviate from your original planned route. (Hopefully your plan includes a backup point you have in your “get out of here plan.”) Getting there may require you to be able to navigate by compass as roads, paths etc. maybe unsafe travel lanes. In my case I would be planning to get back to my base or nearest safe haven in a personal emergency. I need to know how to navigate by Compass. Understanding this requires me to use the #8 C in the 10 C’s of survival. The compass.
As we plan our survival strategy we must always take into consideration the ever present “Murphy’s Law”. If it can go wrong it will. We cannot plan for every scenario, But we can be as prepared as possible to deal with it. The Compass is a great under utilized tool. The word navigation has all sorts of effects on the average Joe. “I’m not a sailor”, “I don’t know how to use a compass”, “There is no water within 100 miles of me”, “where is north”, and many other thoughts go through our mind. Well Ok my mind. To tell the truth, Compass navigation is not my strong point. I struggled with it, in my time in the Military, and that was 30 years ago. When I was reasonably smart. Now…Not so much. What I learned in the Military, I have long forgotten. It’s time to renew that acquaintance. So without further ado. Here we go.
The Compass:
From Wikipedia: I quote ……
‘A compass is an instrument used for navigation and orientation that shows direction relative to the geographic “cardinal directions“, or “points”. Usually, a diagram called a compass rose shows the directions north, south, east, and west on the compass face as abbreviated initials. When the compass is used, the rose can be aligned with the corresponding geographic direct………” OH GOOD LORD!. That was a mistake.
Here, hopefully this will make you (me) feel better. A picture of my Compass.

Ok!, Now we have a compass. However before we go on our little Navigation learning trip.
(NOTE: First and foremost. If you find yourself in a “lost” situation. Be prepared to admit it. Understand you are lost. DO NOT PANIC. Yes I have said this before and it especially applies to this scenario. You need to have a clear head to be able to navigate. It requires you to think clearly. Panic will distort your thinking. You will doubt the compass bearing, you can become very disorientated and make a bad “lost situation” even worse. Take the time to settle your thoughts. Then begin the process.)
There are a few things we need to be clear on. These are the navigation knowledge points we need to know and be comfortable with. They Include:
Understanding how to read a map. Every good topographic map should have minimum information on it.


A typical map legend and A hand draw map I did after scouting a area I planned to go into. The map shows North arrow and you can see I aligned the North arrow with the North pointing arrow on the compass. Very basic map, but better than not having a map at all.
- North arrow
- Scale
- Legend
- Declination angle
These should be on any “Good” map of an area.
Use of a Compass. (One that meets a minimum requirement.)

- Magnetic needles. Points towards Magnetic North
- Azimuth Ring. ( North, South, East and West. With degrees for 360. (2 deg increments best)
- Base plate
- Dog House. (Orienting arrow)
- Orienting lines (Declination lines)
- Optional items (Not necessary but handy). Magnifier, scale on side of base plate, Mirror, luminous dials and needle and Declination adjustment.
Typical nomenclature used in determining a bearing. (Navigating)
Magnetic north is actually the true north a compass will point to. However because the world is round and maps are “flat”. we need to adjust for this difference. This is called declination. All good maps will give you the declination of the map.  If you are going to be plotting a long distance to travel, you will need to take this change into account. Relatively short distances will be less affected by this.
Dog House is a term used for the orienting arrow on a compass. ( I believe it comes from the fact that the arrow typically looks like a drawn dog house)
Azimuth Ring, this is the moving ring around a Compass, that has the points of a compass. North, south, east and west. North west etc. etc. It is marked in degrees and there are 360 Degrees in the complete circle.
Orienting lines, These are lines on your compass that assist you in adjusting for declination.
The basic process is listed below.

- Orient your map so the north arrow on it points north.
- Determining as precisely as possible you location on a map you have. (Using landmarks)
- Determine where you want to go to, on the map.
- Determine the direction you will need to move in order to get to that location
- Using this direction use the compass to keep your bearing.
- Move in the direction the compass guides you until you get to your destination.
Now to be honest, I have tried to put the whole process into words. A number of times to no avail. Its very confusing. So I will send you to a Compass video on one of my favorite You Tube channels. (NOTE: Survival on Purpose is a great resource. There are many videos on survival skills and reviews on tools you may be interested in. I really like his under $xx.xx videos which gives you ideas for items you might need in that price range). I know its the easy way out. However I would rather you see the correct easy to understand process, than my confused written explanation. And I consider this channel one of my “Go To Experts” for this kind of information. Should you find this channel help full please subscribe and support a great resource. A link to Bryan Stevens channel can be found under Survival on Purpose on my resource page, under Links to You Tube survival sites.
I highly recommend you become familiar with the area you to plan to go to. Scout it out. This becomes especially important in a Urban situation. Being familiar with easily recognized landmarks is half the navigation. Streets, Roads and highways travel in certain directions. Large prominent building or structures should be marked on the map to help in Urban navigation. Being familiar with them will make your task that much easier. Scouting a wilderness location is just as important. Maps are a general layout. But in real life, Mother nature changes regularly. Keep current with your location.make sure to visit the area on a regular basis, and update your maps for future reference.
I hope to have my own video soon for you to get confused with. But in the mean time lets use an expert source to get us going in the right direction.
Remember “Knowledge is a survival skill”
Even if that knowledge means referring to an expert

Until next time. #9 Cargo Tape.
The Novice Survivalist
Finding the perfect Pack for your survival skills and tools

Lately have been doing some work on my Emergency/Survival packs. Not the contents although I have been covering that, more the actual pack, bag or pouch to carry your survival gear. It’s not …
Source: Finding the perfect Pack for your survival skills and tools
Finding the perfect Pack for your survival skills and tools
Lately have been doing some work on my Emergency/Survival packs. Not the contents although I have been covering that, more the actual pack, bag or pouch to carry your survival gear. It’s not really something I have covered in previous Blogs or even the website. So here we go.
I have over time gathered a number of Packs, Bags and Satchels. As I learn or add equipment and information I find myself changing what I use to carry my Emergency/survival equipment. Some started small and got bigger, some shrunk. It depends on what I learned or read about, and from actual use of the carry all. I do know I am spending too much money, looking for that perfect carrier.
I suspect there is no such thing as the perfect, off the shelf carry bag for every person out there. The pros I follow, seem to all have modified the bags to meet their needs.
I look for 3 types of bags for my use.
- EDCC (see Blog)
- Day pack (See video on my you tube channel)
- Home/Go bag (coming soon to you)
Right now I think I am the owner of between 7-8 bags, packs, or Satchels. Averaging 2 per use type from the list above. Spending between $20.00 to $55.00 per. the main reasons I have changed have not been too small or too big, but was lacking in something in my personal requirement for that carrier.

A perfect example is I bought 2 Satchels, as a combo purchase and were the exact thing I was looking for. I actually used them a number of times. They were perfect, right up until it rained on one and I fell into water with the other. They were made of Canvas. Good sturdy canvas. That sucked up water like there was no tomorrow and still 100 miles of desert to go. In doing so, all the “stuff” I had inside got wet. I could not find a satisfactory, guaranteed method to waterproof them. so they have been relegated to back ups. And of course replaced for a small fee. Yes the replacement is water proof. Basically the same size as my larger Canvas Satchel.

The smallest satchel has been replaced by a smaller EDCC, I covered in a previous blog. (My EDCC)
I think that when you are looking for your current kit bag, whether for EDC, day pack, equipment carry all, bug out Bag. or for putting certain items together for quick grab and go, or Storage. you will have to put down what you are looking for , What’s going into it, Size, weight, etc. Be forewarned. It may take 2-3 attempts before you get exactly or almost the perfect kit bag you wanted.
If you purchase from an online store, look for returns accepted from the seller. When you get the product, Take the time, as soon as possible, to make sure it works for your needs. If not, send it back. Obviously undamaged. Although I feel I’m pretty much satisfied with my current bags, I have that nasty itchy scratchy feeling, I’ll need to change them.
Personally I believe it’s a growing pain we will have to endure. As we learn new tasks and skills our tools of the trade will change. It’s a ripple effect. Something changes and the bag it will be in, has to change. Oh no!
Good luck and plan ahead, shop smart.
The novice Survivalist.
“Knowledge is a survival Skill.”(And can be expensive)
EDCC – Every Day Car Carry
Yes its true I made this up. Its my version of a EDC bag.(Every Day Carry). In my professional life, My work takes me all over the area I live in. I spend an average of about 5-6 hours driving. I …
Source: EDCC – Every Day Car Carry
EDCC – Every Day Car Carry
Yes its true I made this up. Its my version of a EDC bag.(Every Day Carry). In my professional life, My work takes me all over the area I live in. I spend an average of about 5-6 hours driving. I then service clients in their locations. It would be inappropriate to have a EDC on me when in their locations. So I have a EDCC. It is in my pickup all the time.
Its basically a Army surplus pouch for attaching to bigger packs with molly straps. I found it one day while window shopping a surplus store. It is just large enough for me to have the items I need for a EDCC. And is small enough to fit on my belt. This pouch is part of my 3 Emergency kits I have.

I refer to them as Emergency packs while most survivalists prefer things like, Survival kits EDC, Bug out bag. etc. For me these are for emergencies while Kayak camping, fishing days, outdoor walk about and every day use. The biggest is for home emergency should I need to evacuate my home (See my dirt time video on my reference page, under Home Emergency kit 2017). My Emergency Day pack (see resource page under Emergency Day pack 2017)is a smaller Satchel type Kit. They are there for emergencies. None are really for long term survival. Although they may have the essentials for that scenario. (See 10 C’s of survival blog.)
Side note, Army surplus stores are a candy store for the survivalist. Not only do they have just about everything you would want as a novice survivalist, they typically can beat any price out there. Most of the equipment they carry are as the name says, Army surplus. That means most of the products have been manufactured to Military standards. Very sturdy and well made.
Back to my EDCC. In this pouch are the following items. I feel they will get me through any overnight emergency situation.
1. Survival knife with small fire starter rod (Ferrocerium flint rod ).the sheath can go on my belt.
2.Large fire starter. (another Ferrocerium flint rod)
3. Misc. 550 cord. In all about 5 feet.
4. Basic compass/ whistle/ temperature gauge
5.Small multi-tool
6. Flash light/ lantern
7.Spare AAA batteries
8. Cotton balls (2)
9.Misc. band aids
10. Pencil
11. Carabineer


Although I am mostly in Urban areas, these packs are mostly suited for wilderness emergencies, I do have tools available to me in my Pick up. They will certainly enhance this pouch. I have an extra set of clothes and toilet bag in my pickup, as some times I may need to stay over night when working. It includes a shirt, long pants, under wear, socks and a light jacket. I pack my food for work and tend to over pack. So always have extra. I always have my faithful folding Buck knife in my pocket. 24/7 companion.
Some thing to consider in your every day work week.
Just saying,
Novice Survivalist.
“Knowledge is a survival skill.”
My Knives I use the most
A look at my 5 knives I have when camping etc. This video cost me a lesson in knife safety…..
Enjoy my pain ….
George
New cutting tool added to my stash

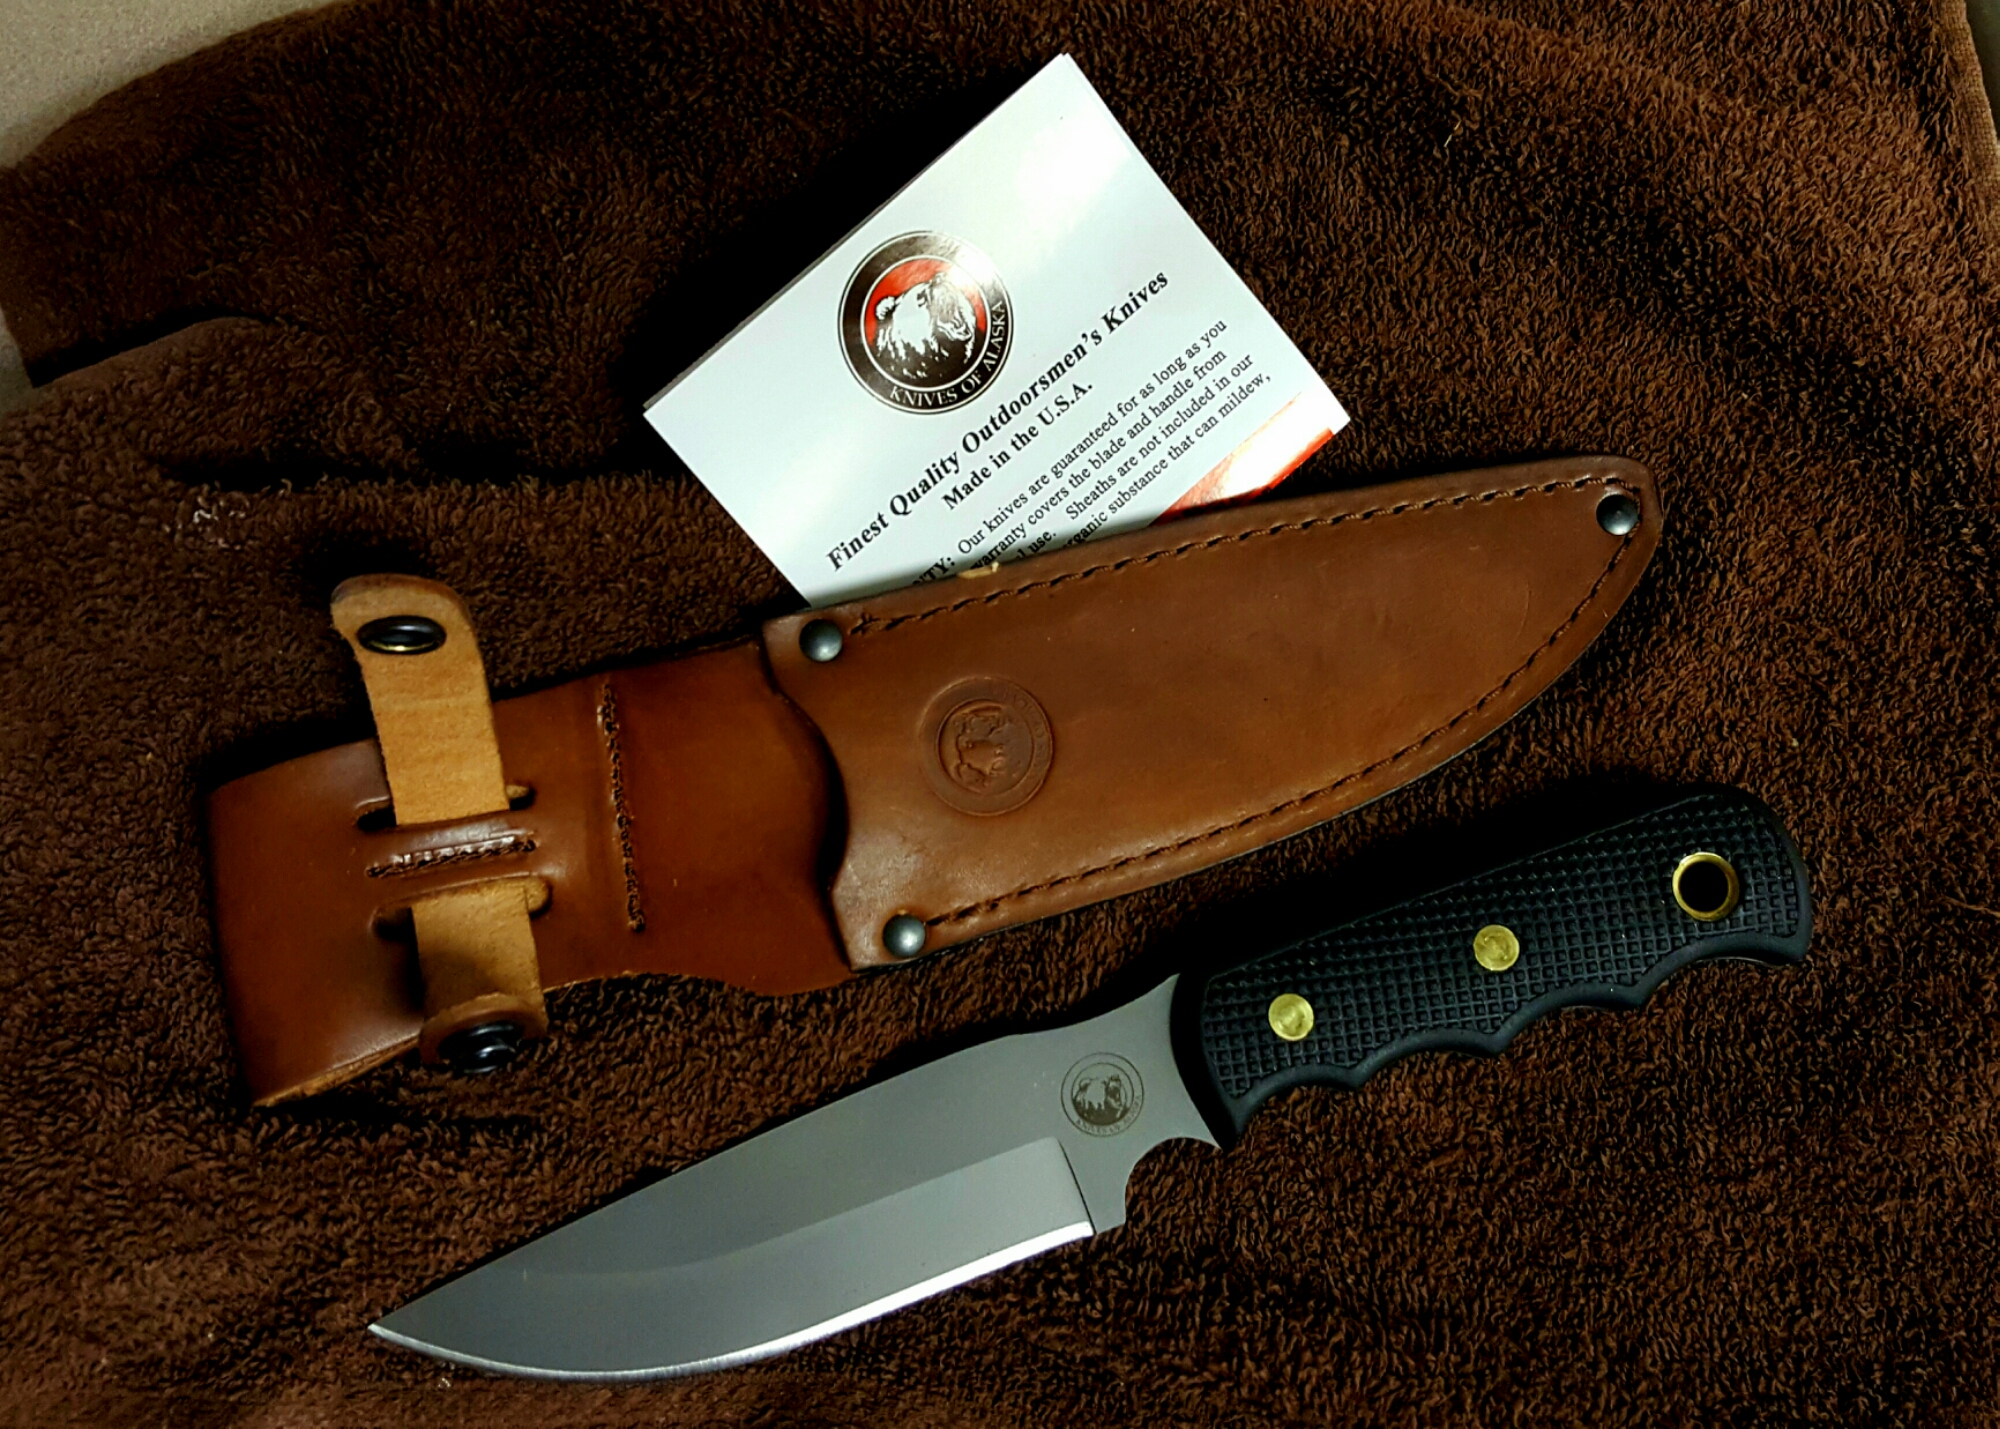
 I just recently added this ” belt knife” to my cutting tool collection. It will replace my smaller previous belt knife, which has will go into my Kayak survival bag. This new cutter is …
Dirt time 7- Cotton Bandana
 Cotton Bandana. Yes a bandana, And specifically 100% cotton. Why, The obvious reason is its a bandana. Useful in getting sweat off your face, and hanging around your neck. After all its a fashion s…
Source: Dirt time 7- Cotton Bandana
Dirt time 7- Cotton Bandana
Cotton Bandana.
Yes a bandana, And specifically 100% cotton. Why, The obvious reason is its a bandana. Useful in getting sweat off your face, and hanging around your neck. After all its a fashion statement. For the everyday person that is. But for us survivalist types, well….
The reasons the “Cotton Bandana’ item is on the 10 C’s of Survival list is
- It wipes the sweat from your face
- It should be a bright orange color and used as a signaling device.
- Can Be used to filter large debris from water to be purified for drinking
- Makes Char cloth for fire starting
- A make shift bandage for wound care
- Used for keeping small items together
- Made into strips to lash together items or supports for a shelter, To name a few.
And you thought it was just a bandana.
Although it does not make the first must have 5 items in the list, it is a multi use item. Easy to store or carry on your person, either in a pocket or yes, around your neck. Its an easy add to the list.
There are many different kinds, sizes and colors available to the survivalist or camper. However a must is it has to be cotton. 100% cotton. Using it to make char cloth is the number one important use of the Bandana in my ” Novice ” opinion. Number 2 is its use as a signaling device to alert rescue to your location. The brighter and louder the color the better. However signal orange is the way to go.
A search for a bandana for your emergency kit will reveal many options. As previously mentioned size and color options are the obvious. You can get them in signal orange, along with “how to” survival advise imprinted on one side. Useful tips for the survivalist.
As I mentioned, for me the Char cloth is my main interest in the bandana. However making it (Char cloth) seems quiet a challenge to me. I imagine, the shock, a lot of practice will be needed. Here is the basics from what I understand.
First off……
Char Cloth:
From Wikipedia….”Char cloth (or charcloth) – also called charpaper – is a swatch of fabric made from vegetable fiber (such as linen, cotton or jute) that has been converted via pyrolysis into a slow-burning fuel of very low ignition temperature.”
So all you need is …
- A small tin, like an altoid tin.
- Something to make a small hole in the lid ( Nail Knife…etc.)
- A fire or some good hot coals
- Some Cotton Cloth.
And you are set to process some Char Cloth. Easy ha?. We will see. Having read up on this and watched very carefully, how to videos , I am still skeptical. This will require some learning. Maybe even a couple of tries before any great success. But as a survivalist “we must persist.”
Don’t have access to the outdoors to build a fire etc. Well here is a link to a great how to make it while indoors. Click here to view the how to video from Tactical Intelligence channel.
Here is what I believe I need to do.
- Cut some strips of 100% cotton cloth. (Bandana, T shirt or Denim seems to be the norm. here).
- Place then into a small tin with a lid. The lid needs to have a small hole in it to allow for gasses to escape out.
- Place the tin in a fire or hot coals and watch for the gasses to expel out of the hole in the lid.(If you are doing this indoors on a stove you might want to ignite the gasses to prevent your fire alarm from going off.)
- Once the gasses/smoke stop the Char cloth is ready.
It important to wait for the tin to cool before opening. If the Char cloth is ready it should be a solid black color and crumble in you fingers . If there is a brown color still showing the Char is not complete. back to the fire or heat source until its all black.
Using the char cloth gives you the survivalist another quick fire starter option. It is extremely easy to get an ember from it. Using a Ferrocerium rod and steel, lighter or any other method, to get your birds nest (tinder)going.
So I am sure you will be expecting the usual accompanying video so stay tuned its coming.
Remember, “Knowledge is a survival skill”
Don’t forget to check out my resource page. Lots of interesting and fun Videos and links
The novice Survivalist
New cutting tool added to my stash
I just recently added this ” belt knife” to my cutting tool collection. It will replace my smaller previous belt knife, which has will go into my Kayak survival bag.
This new cutter is the Knives of Alaska, 0014FG, Bush camp suregrip. I really like the weight, size and feel of this knife. I thinks it’s a perfect belt knife for me
Enjoy
Remember ” Knowledge is a survival skill”
